Friday, April 3, 2009

How to Dual Boot Windows 7 and Ubuntu 9.04

Finally, it’s done. Ever since I installed Windows 7, I couldn’t dual boot with Ubuntu, which was quite a frustration for me. But when Jaunty Jackalope sprang out in beta, the endless search for a tutorial how to do it finished. And Wubi doesn't work in Windows 7. (yet)
So this is how it’s done:

Step 1: You need a PC with Windows 7 installed. Preferably build 7057 or better.

Step 2: Download the beta of Ubuntu 9.04 ( Jaunty Jackalope) from www.ubuntu.com and burn it on a CD. (click here to start downloading).You can download from a direct link, or a torrent. My advice is to use a torrent client, since if your internet connection goes down or anything else goes wrong you will be able to continue the download. (click here to download the torrent file).

Step 3: Insert the burned CD (or DVD) into the computer and restart. The point is to boot from the CD (again, or DVD). (currently only CDs are available, but once the final release is out, there'll be DVDs here)

Step 4: After you have booted in Ubuntu double click the Install Icon on Desktop.


Step 5: And the standard procedure begins:

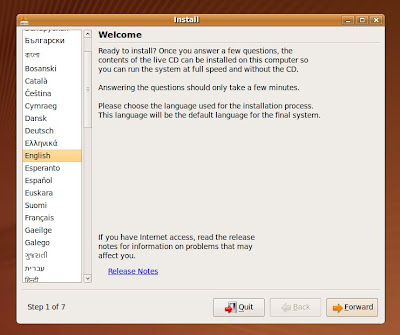
First choose language. English is default. Click "Forward".

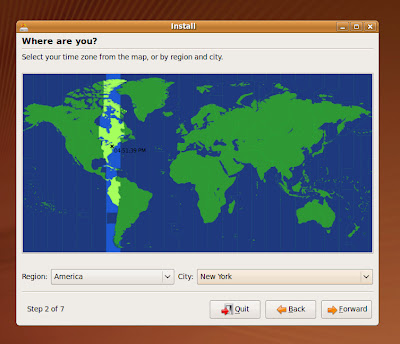
Now choose time zone. Click "Forward".

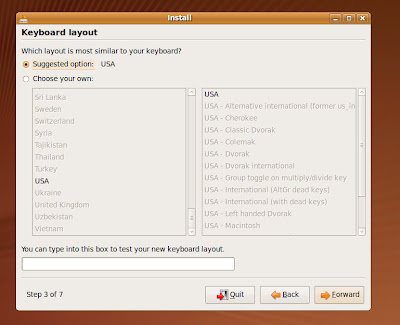
Next is my favorite, the keyboard input layout.

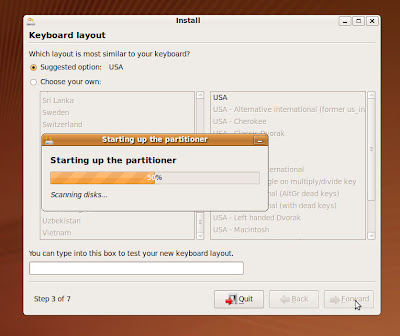
And after you click Forward, the magic begins. Previous Ubuntu Editions (8.10 and below) couldn’t discover that there’s another OS on the computer, Jaunty Jackalope recognizes Windows 7 as Windows Vista, and although it doesn't do justice to Windows 7, that'll do just fine.

You can see the partitioner scanning the hard drives, on the screenshot below, checking for space and another OS.

Step 6: When the partitioner is done you can choose how much space from the disk you want for your Ubuntu. (This means that both OS will be on the same partition, so when in Windows you won’t be able to see the part of it where Ubuntu is installed, because the Windows partition will be shrunk).

In order to do so check “Install them side by side, choosing between them on each startup”.

And now you can drag the black separator with the mouse on the line to specify the space you want to be cut from the partition for Ubuntu. After you do that click "Forward".

And I don’t have anymore screenshots, because I’m an idiot, but don’t worry.

There’s not much to do, except wait.
Once you click Forward, the partitioner will first ask you if you are sure that you want to execute the specified actions, and it will warn you that two partitions will be formated. One primary partition for Ubuntu and a Swap partition. (The Windows partitions is "sda1", so the partitions that will be formated will be marked as "sda2/3/4/5...", or other numbers depending on the number of hard disks you have).

You can click Forward on that window too. Those two partition will be created from your OS drive, while the rest of the data on the drive will remain intact. This means a lot of waiting if your Windows partition is not well fragmented. I repeat you might wait for an entire hour or even more just for the partitioner to finish creating the partitions. While the installing of the system will be quite fast.

After the installing will finish, the computer will restart, (it might ask you to remove the CD first, I don’t remember.)

After the first reboot, the Grub Loader will make Ubuntu as the default OS. You can change this by following instructions, provided here. (if instructions are not provided it means I haven't written them yet)

Note 1: It is advisable to back up all important data, at least on your OS disk. Although screw ups are not expected, you just never know (that's why back up exist, for things we might not excpect).

Note 2: It's OK that the installer says Windows Vista, like I said Ubuntu "thinks" that Windows 7 is Windows Vista (so not true).

Note 3: Just once more, after step 6, when the partitioner will start creating the partitions for Ubuntu, during all time the progress bar might remain at 0%, but don't worry eventually it will finish.

Note 4: Windows 7 is in beta, Ubuntu 9.04 is in beta too (at least in the next 2 or 3 weeks). It is not recommended to install beta OSs as primary OS on your computer.

On a side note: I now am a proud owner of a machine running on two beta OSs, no crashes, no errors, no BSDs.

Take care.

Saturday, March 21, 2009

Windows 7 RC1 in Screenshots

Rumor has it that in mid April this year Microsoft will start shipping the first release candidate of the much praised Windows 7. Other roumer has it that the first RC is the leaked build 7057. Anyhow here are some screenshots of the last build, which is 7057, to get a glimpse of the look and feel of the new mMicrosoft wonder. It's not an in-depth review, just a couple of screenshots focused on the visual.


This is the standard Aero Flip introduced in Vista.


The new Aero Peek feature in action.


In this build Alt+Tab also features Aero Peek, which wawsn't the case in the previous Windows 7 builds.


The Control Panel showing all items.


The desktop context menu. Notice the new "Screen Resolution" and "Gadgets" entries.


This is the same theme color changer. But on this screenshots you can see the large icons on the new dock-like taskbar. (Which is quite awesome and functional, by the way). While on the screenshot below you can see the taskbar with small icons and the Star Menu with the new Start Button.


Gadgets floating on desktop without the sidebar. I am not a fan of desktop gadgets anyway, but losing the sidebar is great.


The jumplists, with the most recent open files. Interesting is you can pin files to the jumplist that you use more often. Or folders you open on a regular base can also be pined to the jumplist of the windows explorer icon.


This is the new "libriries" feature. Librires contain all the folders of your PC with similar content, and you can orginize them yuorself. For example you can place folders from different partitions in the picture library for fast access, while physicaly the folders are still in their original locations. Some sort of shortcuts you might say.

Go To Page 2 =>

Friday, March 20, 2009

Windows 7 RC1 in Screenshots


The notificatoin area, and cosumizing for it.


Show Desktop icon is not an icon now, but the end of the taskbar, where if you float with the mouse pointer yo get all windows transparent (Aero Peek), and clicking on at the end of the taskbar, minimizes all windows and sjows the desktop.


Snaping windows by draging them to the edge of the screen. Draging to the left or right expands the windows to half of the screen, while draging to the top maximizes the window.


The Snipping tool, for capturing the screen or parts of it in action (taking screenshots).


Solitaire. Nothing new, just few more backgrounds and I had to post it because it's the first game everybody plays.


A little closer look of the Start Menu.


Sticky Notes.


Taskbar Properties.


The action center, which replaces the Security center.


The new calculator.


Desktop Slideshow.


Windows Paint with the new ribbon interface, and below is Wordpad.

Windows explorer.

You can find the wallpaper here, as many other Windows 7 wallpapers too.

<= Back To Page 1

Thursday, March 19, 2009

And This is How you Do It!

So, it' Thursday, March 19 and Internet Explorer is shipping today. What a happy day, for those testing Windows 7, since I am working for a week now without IE on my PC, not just IE8, but no IE in general. I don't want to be like one of those Microsoft bashers because Windows 7 rocks, but Internet Explorer is like the slowest, the most insecure browsers currently on the market. And this is how you turn it off and remove it, in Windows 7 Beta at least.

1. Open Computer>Uninstall or Change Program>Turn Windows Features On or Off

2. This is the Default state of optional Windows features. As you can see IE8 is checked.


3. IF you want to remove Internet Explorer 8 you unchecked. And since I don't use Windows Media Center and don't have a Tablet PC I unchecked those features as well.


And then you click OK.


And after two restarts (depends on what you unchecked) you have a n Internet Explorer Free PC.
That's How you Do It!

Check out the new Windows 7 Wallpapers


Sunday, November 23, 2008

Foxit 3.0

Just a quick not on Foxit 3.0.
From freeware to adware.

Sunday, October 19, 2008

Adobe Photoshop CS4 Screenshots


Adobe Photoshop CS4

The all new Photoshop CS4 (version 11.0) is out, and it looks amazing. The interface is Mac-like (even on Vista), grey and elegant and more important it's very flexible. Now you can open files in tabs in one window, and other files in another window, or just simple one window one file.

The most important feature though is the GPU acceleration, so on graphic cards with at least 128 MB of RAM--and a display driver that supports OpenGL 2.0 and Shader Model 3.0 Photoshop CS4 will run much faster and much smoother. The start up of the program is noticable faster, and also the rendering of aplied filters on higher resolutions.

Sunday, August 3, 2008

When Ubuntu hangs in Initramfs...

If you dual-boot, and windows crashes, or there's a power failure and you try to boot in Ubuntu next, the boot will hang in "initramfs tools". And there's not much you can do with this tools.
The only way to start in Ubuntu again is to:
-boot in Windows
-Start>Shut Down
-Power Button>Ubuntu

In other words, you need to boot in Windows and do a proper Shut Down of the system.

Thursday, July 17, 2008

Pushing Daisies -The Comic Book

For everybody that love the show, and can't wait for the newe episodes this fall, here's the Pushing Daisies Comic Book in pdf. Click the image to download it.


Pushing Daisies

Monday, June 23, 2008

How to install the Stackswitch plugin on Ubuntu Hardy

Today after many hours of trying I finally installed the stackswitch plugin for Compiz Fusion on Ubuntu 8.04. The fianl result was disapointing, at least for me, because I didn't really like it, but for anyone that's open to new experiences, go a head!

First what you need to do is install Compiz Fusion from Git source. In order to do this follow this instructions.
Note: first uninstall the previous version of compiz, then follow the instructions.
Note 2: the installation takes a while, so when the terminal goes crazy, just leave it, it'll finish eventually.
Note 3: Restart the Computer
Note 4: in order to run Compiz Fusion Icon on start up go to System>Preferences>Sessions and add another item for Compiz.

After you successfully installed Compiz Fusion from git, it's time to install the stackswitch plugin. (Other experimental plugins will be installed, but on Hardy the stackswitch requires additional setup)

1.Open a terminal and write this command to download the nescessery files:


This will create a folder in your home folder named "stackswitch"

2. Go to the folder typing:


Remember to replace "username" with.... your username.

3. Then type the following lines one by one (once you are in the stackswitch folder)


4. Reload the window manager, and Stack Switch Plugin will appear in Settings Manager under Windows management.

Now you can use the plug in. Although I appreciate more the cube deformation.

Screenshots of stackswitch, sphere, cilindar and the snow plug in.


My favorite, the Sphere. You can set it as screensaver under the screensaver plugin. (Flying windows are available as screensaver too).


The Cilindar (is this spelt correctly? Spellcheck gives me Celinda as alternative):


Snow. You're gonna love this.


The Stackswitcher.

Sunday, June 22, 2008

Evolution of Continents


A short video I made out of 14 pictures, depicting the movement of the continents through the ages.

Saturday, June 7, 2008

Digg's Duplicate Detection System

You just gotta love it, I usually don't pay much attention to the duplicate stories, but this just widens your eyes.

How to remove Vundo/Virtumonde trojan?

I got burned by this motherf**king (sorry for the language) trojan twice. The first time the explorer was quiting everytime I opened a folder and no antivirus was able to detect it. I tried Vundofix, VirtumondeBegone, HiJackThis etc. I even reinstalled the OS, but the trojan was persistent. After two days a message appeared offering a "help" (paid help of course), I ran Kaspersky then, and I got rid of it.
The second time I fried the motherfu**ing b**tard's as* (again, sorry for the bad english) much easier and faster.

THE SOLUTION

What you need is SpybotS&D (Search and Destroy). It's freeware made to get rid of adware. You can download it here. You can choose the beta version or a stable release which is recomended.

Install Spybot, and update it. Then run it and scan your computer. This will take a while. After it's finished look carefully if any of the results is actually something you need (which I doubt it, but if anyone is using cracked OS, the crack might be on the list). Select the Vundo or Virtumonde entry and click Fix Selected Items. Now Spybot will get rid of most Virtumonde/Vundo entries, but some will be unable to.
That's where Spybot will ask you if you want to run Spybot at startup. Choose Yes or OK, I don't remember which was it, and restart your computer.
After restarting only Spybot will run and start checking for problems again. (This is the waiting part which could be about 30 minutes. And again after finishing click Fix Selected Items, but this time since no other program is running Spybot will remove the Vundo/Virtumonde trojan.
Choose Exit from the menu bar and Windows will start.

And that is how it's done.

If any questions, comment. I'll try to help. if it works please do tell, again.

Thursday, June 5, 2008

How to fix the rc.local problem on Ubuntu Hardy

(When rc.local hangs at boot)

I installed Hardy Heron (dual boot with Vista) and it was working fine with the nvidia-glx-new drivers (8500 GT). But the TV-out didn't work or I don't know how to set it up and I installed Envyng, and from than on everything got messed up. The system would boot to the point where the rc.local script runs (which is unedited) than hang and boot in low-res. I uninstalled envy and reinstalled the drivers from synaptic but it still didn't work. Booting in recovery mode only helps the current session, or you would have to boot in recovery mode always, but the desktop effects will be pour. THE SOLUTION IS THIS:

1. First uninstall Envy, nvidia-glx and nvidia-glx-new. (there's a chance you might need to remove compiz too, but first try it like this)
2. Download the latest NVIDIA drivers for Linux. (here's a download link, or visit nvidia.com and download the driver from there)
3. After downloading NVIDIA-Linux-x86-173.08-pkg1.run you need to install it. This is actually the fix, installing this beta driver. How to install it:
-save the file in a folder (Ex. Documents), but remember or write down the path to that folder (/home/username/Documents)
-exit the X enviroment Ctrl+Alt+FF2
-login again and use this lines one by one:

sudo /etc/init.d/gdm stop

cd /home/username/Document

(Note: you can use any folder to save the file as long as you know how to get to it, this is an example. Just make sure the file is in that folder. BTW this is not a line just a note don't write this)

sudo sh NVIDIA-Linux-x86-173.08-pkg1.run

(Accept everything, even if it seems to complicated, all you need to do is select Yes and OK)

sudo /etc/init.d/gdm start

sudo reboot

That's it, your computer will restart, and you will need to adjust the resolution, choose the model of your screen and fix here and there something but the main problem will be fixed. For example with me at first the windows were incomplete, but after I chose driver, screen and screen resolution in Screen and Graphics it fixed the problem)

Monday, May 12, 2008

How to Dual Boot Windows Vista and Ubuntu 8.04 (Hardy Heron)?

After the release of the new LTS Ubuntu edition dual booting has never been made easier for windows users. Ever heard of installers? Yeah, it’s sarcasam. So, in Ubuntu 8.04 the Wubi installer makes it possible to install Ubuntu inside Windows and dual boot them. However this is recommended for Ubuntu beginners to experience Ubuntu more closely, once you get to work your way through Ubuntu you can remove the windows installation or uninstall Ubuntu and reinstall it in a regular dual boot procedure in order to get the best performance. The advantage of this kind of installation is that the boot is managed by Windows Boot Manager, and makes it easy to remove Ubuntu if you ever decide it’s not for you. So here is the procedure:
  1. Boot in Windows, insert the Ubuntu CD and wait for the Auto Start window (if Autostart is disabled, go to Computer and double-click the CD/DVD drive.)

Choose Install Inside Windows.

  1. In the next window choose the Drive where you want Ubuntu installed, Language, the size of the installation (how much space should ubuntu use from the specified hard disk), wirte down Username (all in lower case) and Password.

Now click Install

  1. And your job is done here, the next few steps are automated and Ubuntu does them itself.

After it creates image of the files, the CD eject itself and a window appears which asks to reboot.

Click Finish.

The machine will boot up and Windows Boot Manager will ask which OS you want to boot in, choose Ubuntu.

Your computer will start in Ubuntu after it takes a couple of minutes to actually install the files and after another restart you can start working in Ubuntu.

That’s it! Just like installing a program. If you want to uninstall Ubuntu go to Programs and Features or to the folder Ubuntu in the drive where ubuntu is installed and click uninstall.


Note: You can access windows files on the hard disk where you installed Ubuntu in Filesystem>host.

For a regular dual boot installation read How To Dual Boot Vista and Gutsy Gibbon